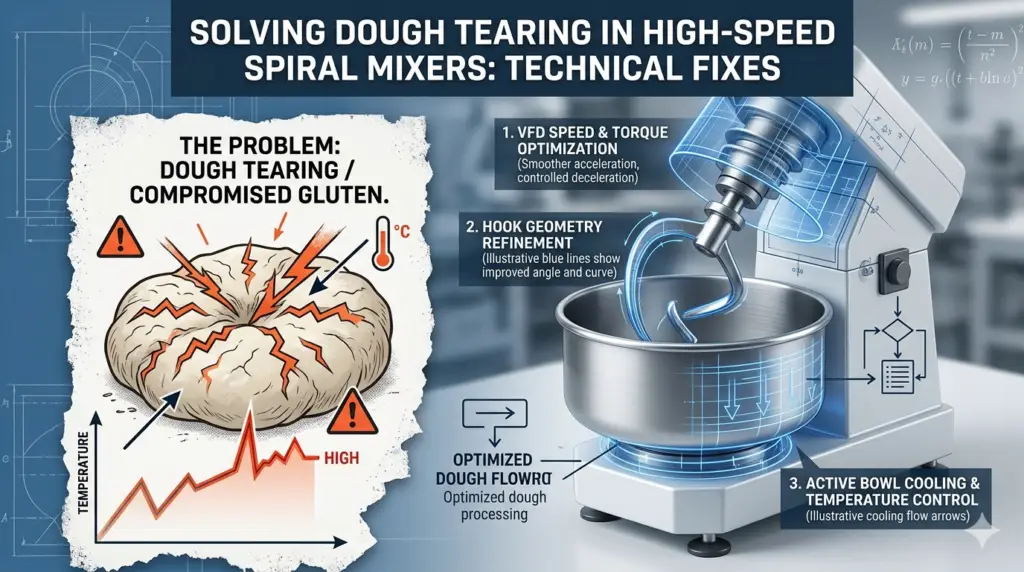
Dough tearing in high-speed spiral mixers is usually caused by excessive heat and mechanical shear. To fix it, keep final dough temperatures below 26°C–27°C, adjust hook-to-bowl clearance to 5mm–7mm, and avoid overmixing at high RPM. Reducing the friction factor via chilled water is the fastest, immediate remedy.
🔹 Key Takeaways
- Thermal Limits: Gluten strands denature and “shred” once dough temperature exceeds 27°C.
- Gap Precision: A hook-to-bowl gap exceeding 10mm causes impact tearing rather than kneading.
- Shear Control: Excessive RPM creates friction heat faster than protein bonds can develop.
Dough tearing in a high-speed spiral mixer is a sign of mechanical shear exceeding gluten elasticity. If your dough looks “shredded” or lacks a smooth windowpane, check your final dough temperature first—it is the fastest way to diagnose the issue. When the mixer’s RPM generates heat faster than the dough can develop, the protein structure collapses. This guide provides the floor-level fixes to stabilize your mix immediately.
Why Dough Tears at the End of Mixing
It is common for dough to look stable at 8 minutes but “shred” by minute 10. This usually occurs because the dough has reached its Critical Temperature Threshold. As the temperature rises, the gluten network softens and becomes less resilient. Consequently, the same hook speed that was developing the dough minutes ago is now physically tearing the protein bonds apart. This is often linked to [Managing Friction Factors in Commercial Mixers].
Systematic Steps to Stop Dough Tearing
1. Calibrate the Mixer Friction Factor
Every mixer adds heat through mechanical energy. Specifically, for high-speed spirals, this “friction factor” is often 10°C to 15°C. If your water temperature isn’t cold enough to compensate for this spike, the dough will overheat and tear.
- The Fix: Use a digital probe to measure the temperature of the flour. Then, use chilled water or ice to keep the final mix below 26°C.
2. Set the 5mm Hook-to-Bowl Clearance
If the gap between the spiral hook and the bowl is too wide, the dough isn’t stretched; it is struck. This creates localized “shear zones” where the dough tears.
- The Fix: Use a feeler gauge to verify the clearance. Specifically, you should maintain a consistent 5mm to 7mm gap. Adjust the bowl lift or hook mounting to correct any drift.
3. Optimize RPM and Hydration Timing
Mixing on high speed for the entire cycle is a common mistake. You must allow the flour to hydrate fully before applying high-shear force.
- The Fix: Start on low speed for the first 3–4 minutes. This ensures full hydration, which makes the gluten more resilient to high-speed development. Furthermore, avoid [Common Hydration Errors] that lead to dry, brittle dough.
⚠️ What the Manual Doesn’t Tell You (The Technician’s Edge)
- VFD Harmonic Drift: In older mixers, Variable Frequency Drives (VFDs) can drift over time. Your display might show 100 RPM, but the hook is actually spinning at 110 RPM. This “ghost speed” creates unexpected shear.
- Bowl Scraper Tension: If the automatic scraper is too tight, it creates friction heat against the bowl. If it’s too loose, a “dead zone” of unmixed flour forms, which later tears the developed dough when it finally incorporates.
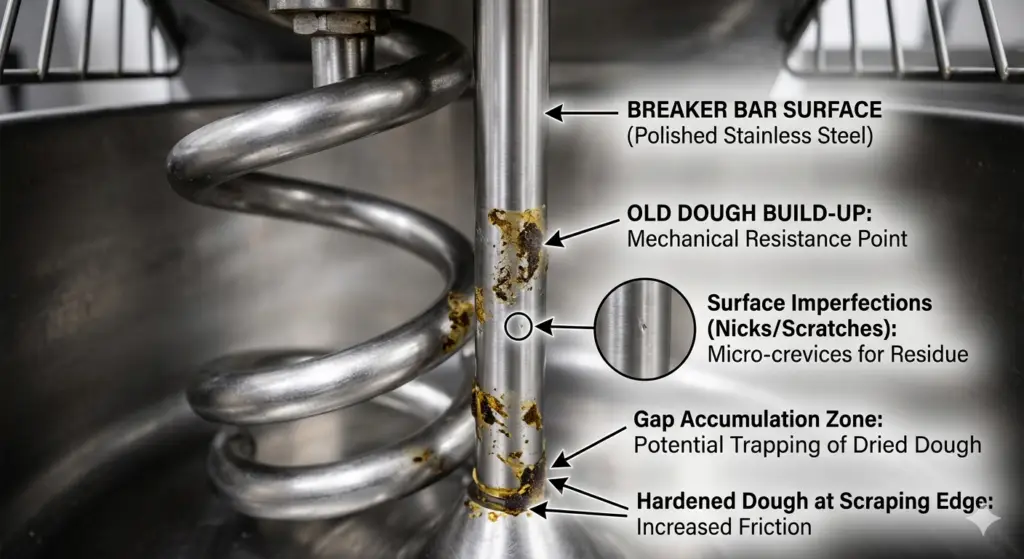
The “Old Dough” Brake
Dried dough buildup on the central breaker bar increases mechanical resistance. Specifically, this acts like a brake pad, generating massive heat spikes in the first 120 seconds of mixing.
Diagnostic Table: Dough Tearing Root Causes
| Symptom | Probable Cause | Technical Fix |
| Shredded/Greyish Dough | Over-mixing/Oxidation | Reduce high-speed mix time by 60s |
| “Snake skin” Tearing | High Friction/Heat | Reduce water temp by 3–5°C |
| Unmixed flour streaks | Hook gap too wide | Adjust hook-to-bowl clearance to 5mm |
| Dough “climbing” hook | Low hydration (<58%) | Increase water or use a relaxant |
| Sudden tearing at end | Delayed salt addition | Add salt earlier to strengthen gluten |
Best Dough Temperature for Spiral Mixers
To prevent tearing and ensure optimal machineability, you should target a final dough temperature of 24°C to 26°C. Exceeding 27°C significantly increases the risk of “shredded” gluten and poor volume in the oven. Additionally, maintaining this range prevents [Common Proofer Sticking Issues] downstream.
Implementation & Calibration Tools
- Verify RPM: Use a handheld digital tachometer to verify that your PLC’s reported RPM matches the actual hook speed.
- Free Tool: [Download our Mixer Calibration & Friction Factor Checklist] to standardize your mixing room operations and stop product waste.
Solving dough tearing is a race against the thermometer. By controlling your friction factor and mechanical clearances, you can ensure a smooth, developed dough every time. Is your line still producing “shredded” batches? [Contact us] for a Mixer Performance Audit, and if you are facing the issue of bun sticking in proofer trays, read [this article] for troubleshooting.
In industrial baking, the critical maximum temperature for dough is 27°C (80.6°F). Once the dough exceeds this threshold, the gluten network begins to soften and lose its elastic recovery. Specifically, if the dough reaches 29°C to 30°C, the mechanical shear of the spiral hook will cause the protein strands to denature and shred. For optimal machineability and fermentation control, technicians should target a final dough temperature between 24°C and 26°C.
To calculate the friction factor for a 200kg mixer, you must perform a test mix and use the “Rule of Three” formula. First, record the temperature of the Room, the Flour, and the Water before mixing. After the mix cycle is complete, measure the Final Dough Temperature. Check details in step two of this checklist
A “shaggy” appearance after a 10-minute mix usually indicates incomplete hydration or mechanical under-development. If the dough has not formed a smooth, cohesive surface, the spiral hook may be failing to pick up the dough from the bottom of the bowl. This is often caused by a hook-to-bowl clearance exceeding 10mm. Furthermore, if your flour has high protein content (above 13%), it may require an autolyse period, a 10-minute rest to allow the moisture to penetrate the bran and starch before high-speed development begins.